In this tutorial we are going to setup LDAP server using 389 Directory Server. The 389 Directory Server is an enterprise class open source LDAP server developed by Redhat Community.
Features
– Multi-Master Replication, to provide fault tolerance and high write performance.
– Scalability: thousands of operations per second, tens of thousands of concurrent users, tens of millions of entries, hundreds of gigabytes of data.
– Active Directory user and group synchronization.
– Secure authentication and transport (SSLv3, TLSv1, and SASL).
– Support for LDAPv3.
– On-line, zero downtime, LDAP-based update of schema, configuration, management and in-tree Access Control Information (ACIs).
– Graphical console for all facets of user, group, and server management.
Prerequisites
– The LDAP server should contain the valid FQDN. Add the ldap server details to your DNS server.
– Adjust the firewall to allow ldap ports.
– Enable EPEL and REMI repositories to avoid any dependencies problems.
– Adjust the firewall to allow ldap ports.
– Enable EPEL and REMI repositories to avoid any dependencies problems.
Follow the below links to Add EPEL and REMI Repository.
In this how-to my LDAP server details are given below.
Operating System : CentOS 6.5 server
Host name        : server.unixmen.local
IP Address       : 192.168.1.101/24.
Set your server fully qualified domain in /etc/hosts file.
Edit file /etc/hosts/,
# vi /etc/hosts
Add your hostname as shown below.
[...]
192.168.1.101   server.unixmen.local    server
Change the values as per your requirement. This tutorial will applicable for all RHEL/CentOS/SL 6.x series.
Firewall Configuration
Add the following ldap ports to your iptables. To do that, edit file “/etc/sysconfig/iptables”,
# vi /etc/sysconfig/iptables
Add the following lines.
[...]
-A INPUT -m state --state NEW -m tcp -p tcp --dport 389 -j ACCEPT
-A INPUT -m state --state NEW -m tcp -p tcp --dport 636 -j ACCEPT
-A INPUT -m state --state NEW -m tcp -p tcp --dport 9830 -j ACCEPT
[...]
Restart firewall.
# service iptables restart
Performance and Security tuning for LDAP server
Before installing LDAP server, we have to adjust some files for performance and security.
Edit file “/etc/sysctl.conf”,
# vi /etc/sysctl.conf
Add the following lines at the end.
[...]
net.ipv4.tcp_keepalive_time = 300
net.ipv4.ip_local_port_range = 1024 65000
fs.file-max = 64000
Edit file “/etc/security/limits.conf”,
# vi /etc/security/limits.conf
Add the following lines at the bottom.
[...]
*               soft     nofile          8192
*               hard     nofile          8192
Edit file “/etc/profile”,
# vi /etc/profile
Add the line at the end.
[...]
ulimit -n 8192
Edit file “/etc/pam.d/login”,
# vi /etc/pam.d/login
Add the line at the end.
[...]
session    required     /lib/security/pam_limits.so
Now Restart the server.
Install 389 Directory Server
Create a LDAP user account.
# useradd ldapadmin
# passwd ldapadmin
Now install 389 directory server using command:
# yum install -y 389-ds openldap-clients
Configure LDAP server
Now it’s time to configure LDAP server. It’s quite long way process. Run the following command to configure 389 directory server.
# setup-ds-admin.pl
You will be asked a couple of questions. Please read the instructions carefully and answer them accordingly.
If you made any mistake and want to go back to previous screen press CTRL+B and Enter. To cancel the setup press CTRL+C.
============================================================================== This program will set up the 389 Directory and Administration Servers. It is recommended that you have "root" privilege to set up the software. Tips for using this program: - Press "Enter" to choose the default and go to the next screen - Type "Control-B" then "Enter" to go back to the previous screen - Type "Control-C" to cancel the setup program Would you like to continue with set up? [yes]: ## Press Enter ## ============================================================================== Your system has been scanned for potential problems, missing patches, etc. The following output is a report of the items found that need to be addressed before running this software in a production environment. 389 Directory Server system tuning analysis version 23-FEBRUARY-2012. NOTICE : System is i686-unknown-linux2.6.32-431.el6.i686 (1 processor). WARNING: 622MB of physical memory is available on the system. 1024MB is recommended for best performance on large production system. WARNING : The warning messages above should be reviewed before proceeding. Would you like to continue? [no]: yes ## Type Yes and Press Enter ## ============================================================================== Choose a setup type: 1. Express Allows you to quickly set up the servers using the most common options and pre-defined defaults. Useful for quick evaluation of the products. 2. Typical Allows you to specify common defaults and options. 3. Custom Allows you to specify more advanced options. This is recommended for experienced server administrators only. To accept the default shown in brackets, press the Enter key. Choose a setup type [2]: ## Press Enter ## ============================================================================== Enter the fully qualified domain name of the computer on which you're setting up server software. Using the form. Example: eros.example.com. To accept the default shown in brackets, press the Enter key. Warning: This step may take a few minutes if your DNS servers can not be reached or if DNS is not configured correctly. If you would rather not wait, hit Ctrl-C and run this program again with the following command line option to specify the hostname: General.FullMachineName=your.hostname.domain.name Computer name [server.unixmen.local]: ## Press Enter ## ============================================================================== he servers must run as a specific user in a specific group. It is strongly recommended that this user should have no privileges on the computer (i.e. a non-root user). The setup procedure will give this user/group some permissions in specific paths/files to perform server-specific operations. If you have not yet created a user and group for the servers, create this user and group using your native operating system utilities. System User [nobody]: ldapadmin ## Enter LDAP user name created above # System Group [nobody]: ldapadmin ============================================================================== Server information is stored in the configuration directory server. This information is used by the console and administration server to configure and manage your servers. If you have already set up a configuration directory server, you should register any servers you set up or create with the configuration server. To do so, the following information about the configuration server is required: the fully qualified host name of the form . (e.g. hostname.example.com), the port number (default 389), the suffix, the DN and password of a user having permission to write the configuration information, usually the configuration directory administrator, and if you are using security (TLS/SSL). If you are using TLS/SSL, specify the TLS/SSL (LDAPS) port number (default 636) instead of the regular LDAP port number, and provide the CA certificate (in PEM/ASCII format). If you do not yet have a configuration directory server, enter 'No' to be prompted to set up one. Do you want to register this software with an existing configuration directory server? [no]: ## Press Enter ## ============================================================================== Please enter the administrator ID for the configuration directory server. This is the ID typically used to log in to the console. You will also be prompted for the password. Configuration directory server administrator ID [admin]: ## Press Enter ## Password: ## create password ## Password (confirm): ## re-type password ## ============================================================================== The information stored in the configuration directory server can be separated into different Administration Domains. If you are managing multiple software releases at the same time, or managing information about multiple domains, you may use the Administration Domain to keep them separate. If you are not using administrative domains, press Enter to select the default. Otherwise, enter some descriptive, unique name for the administration domain, such as the name of the organization responsible for managing the domain. Administration Domain [unixmen.local]: ## Press Enter ## ============================================================================== The standard directory server network port number is 389. However, if you are not logged as the superuser, or port 389 is in use, the default value will be a random unused port number greater than 1024. If you want to use port 389, make sure that you are logged in as the superuser, that port 389 is not in use. Directory server network port [389]: ## Press Enter ## ============================================================================== Each instance of a directory server requires a unique identifier. This identifier is used to name the various instance specific files and directories in the file system, as well as for other uses as a server instance identifier. Directory server identifier [server]: ## Press Enter ## ============================================================================== The suffix is the root of your directory tree. The suffix must be a valid DN. It is recommended that you use the dc=domaincomponent suffix convention. For example, if your domain is example.com, you should use dc=example,dc=com for your suffix. Setup will create this initial suffix for you, but you may have more than one suffix. Use the directory server utilities to create additional suffixes. Suffix [dc=unixmen, dc=local]: ## Press Enter ## ============================================================================= Certain directory server operations require an administrative user. This user is referred to as the Directory Manager and typically has a bind Distinguished Name (DN) of cn=Directory Manager. You will also be prompted for the password for this user. The password must be at least 8 characters long, and contain no spaces. Press Control-B or type the word "back", then Enter to back up and start over. Directory Manager DN [cn=Directory Manager]: ## Press Enter ## Password: ## Enter the password ## Password (confirm): ============================================================================== The Administration Server is separate from any of your web or application servers since it listens to a different port and access to it is restricted. Pick a port number between 1024 and 65535 to run your Administration Server on. You should NOT use a port number which you plan to run a web or application server on, rather, select a number which you will remember and which will not be used for anything else. Administration port [9830]: ## Press Enter ## ============================================================================== The interactive phase is complete. The script will now set up your servers. Enter No or go Back if you want to change something. Are you ready to set up your servers? [yes]: ## Press Enter ## Creating directory server . . . Your new DS instance 'server' was successfully created. Creating the configuration directory server . . . Beginning Admin Server creation . . . Creating Admin Server files and directories . . . Updating adm.conf . . . Updating admpw . . . Registering admin server with the configuration directory server . . . Updating adm.conf with information from configuration directory server . . . Updating the configuration for the httpd engine . . . Starting admin server . . . output: Starting dirsrv-admin: output: [ OK ] The admin server was successfully started. Admin server was successfully created, configured, and started. Exiting . . . Log file is '/tmp/setupo1AlDy.log'
Make the LDAP server daemon to start automatically on every reboot.
# chkconfig dirsrv on
# chkconfig dirsrv-admin on
Test LDAP Server
Now let us test our LDAP Server now for any errors using following command.
# ldapsearch -x -b "dc=unixmen,dc=local"
Sample output:
# extended LDIF # # LDAPv3 # basewith scope subtree # filter: (objectclass=*) # requesting: ALL # # unixmen.local dn: dc=unixmen,dc=local objectClass: top objectClass: domain dc: unixmen # Directory Administrators, unixmen.local dn: cn=Directory Administrators,dc=unixmen,dc=local objectClass: top objectClass: groupofuniquenames cn: Directory Administrators uniqueMember: cn=Directory Manager # Groups, unixmen.local dn: ou=Groups,dc=unixmen,dc=local objectClass: top objectClass: organizationalunit ou: Groups # People, unixmen.local dn: ou=People,dc=unixmen,dc=local objectClass: top objectClass: organizationalunit ou: People # Special Users, unixmen.local dn: ou=Special Users,dc=unixmen,dc=local objectClass: top objectClass: organizationalUnit ou: Special Users description: Special Administrative Accounts # Accounting Managers, Groups, unixmen.local dn: cn=Accounting Managers,ou=Groups,dc=unixmen,dc=local objectClass: top objectClass: groupOfUniqueNames cn: Accounting Managers ou: groups description: People who can manage accounting entries uniqueMember: cn=Directory Manager # HR Managers, Groups, unixmen.local dn: cn=HR Managers,ou=Groups,dc=unixmen,dc=local objectClass: top objectClass: groupOfUniqueNames cn: HR Managers ou: groups description: People who can manage HR entries uniqueMember: cn=Directory Manager # QA Managers, Groups, unixmen.local dn: cn=QA Managers,ou=Groups,dc=unixmen,dc=local objectClass: top objectClass: groupOfUniqueNames cn: QA Managers ou: groups description: People who can manage QA entries uniqueMember: cn=Directory Manager # PD Managers, Groups, unixmen.local dn: cn=PD Managers,ou=Groups,dc=unixmen,dc=local objectClass: top objectClass: groupOfUniqueNames cn: PD Managers ou: groups description: People who can manage engineer entries uniqueMember: cn=Directory Manager # search result search: 2 result: 0 Success # numResponses: 10 # numEntries: 9
The output will look something like above. If you have got result as 2 shown in the above output, you’re done. Now our LDAP server is ready to use.
Manage 389 ds with Admin Server Console
Please be mindful that if you want to manage your 389 ds server graphically, your server should have installed with a GUI environment. If you did a minimal installation, you can’t access the admin server console.
As i have minimal server, i am going to install XFCE desktop on my server.
# yum groupinstall Xfce
Reboot your server.
# reboot
Log in to server.
Now you can access the 389 ds admin console either locally or remotely.
To access 389 ds admin console locally, type 389-console.
To access 389-ds admin console from your remote system, enter the following command in Terminal.
$ ssh -X root@192.168.1.101 /usr/bin/389-console -a http://192.168.1.101:9830
Now you’ll be asked to enter your LDAP server administrative log in details. In my case my LDAP admin name is admin and password is centos.
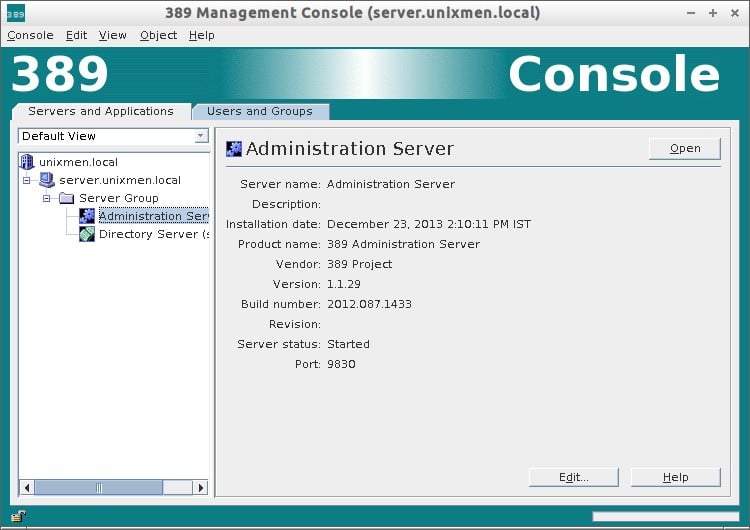
 This is how my admin server console looks.
 From here you can create, delete or edit LDAP organizational units, groups and users graphically.
389-ds admin server console has two groups.
– Administration Server
– Directory Server
You can use any one of the server.
1. Administration Server
To access Administration Server interface, click on your LDAP domain name to expand. Go to Server Group – Administration Server and click Open on the right side. Refer the following screenshot.
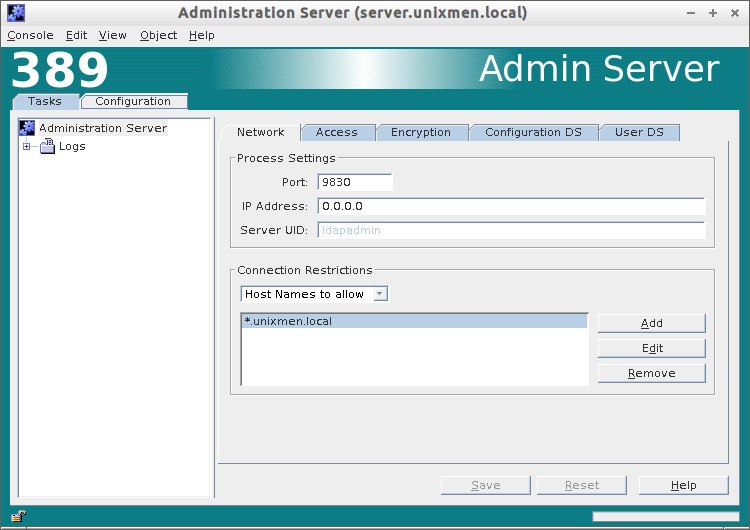
 Configuration tab:
In the Configuration tab, you change/edit your Admin server ip address, default port, LDAP admin password, default user directory. Also you can define which host names to allow and which ip addresses to allow to access your LDAP server.
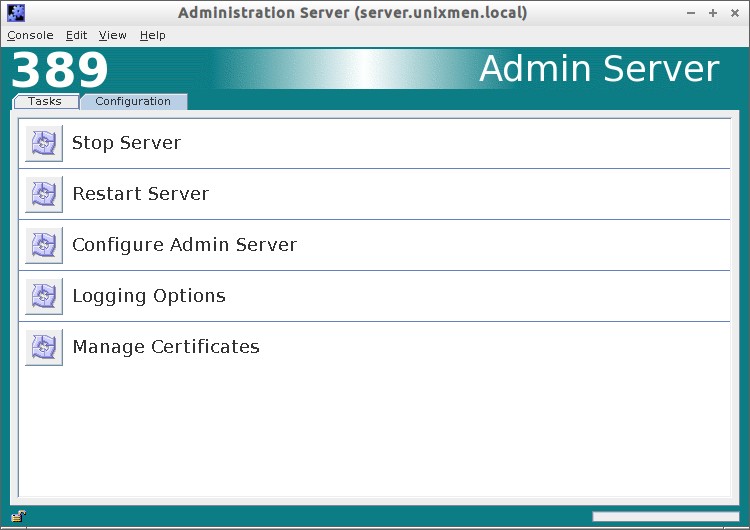
 Tasks Tab:
In the Tasks section, you can Stop/Restart/Configure your server.
 2. Directory server
To access Directory Server interface, click on your LDAP domain name to expand. Go to Server Group – Directory Server and click Open on the right side. Refer the following screenshot.
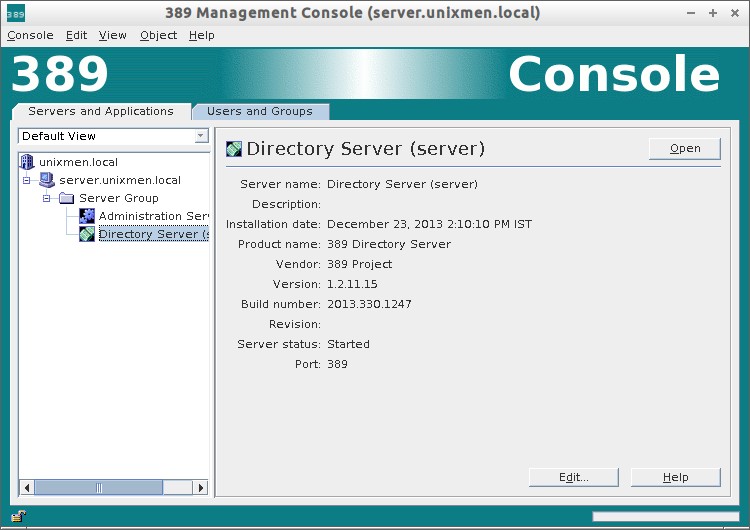 In Directory Server section, you can do all necessary configuration for your LDAP server. You can change/modify default port, create users, groups, organizational units etc.
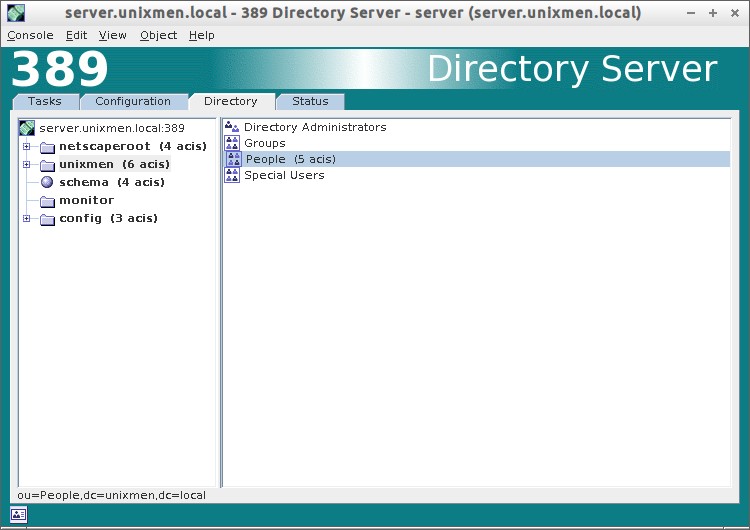
There are lot of options available in Directory Server section. Go thorough the each section and configure as per your requirement.
Create Organization units, Groups And Users
Create organizational unit:
Go to your Directory Server from the main console. In the Directory tab, right click on your Domain name (ex. Unixmen). Select New -> Organization Unit. Refer the following screen.
 Enter your OU name (ex. Support Division) and click Ok.
 The new OU (ex. Support Division) will be created under Unixmen domain.
Create a Group:
Now navigate to Support Division OU and create a new group (ex. support_group).
 Enter group name and click Ok.
 The new group will be created under Unixmen/Support Division.
Create User:
Right click on the Support_group, and click New -> User.
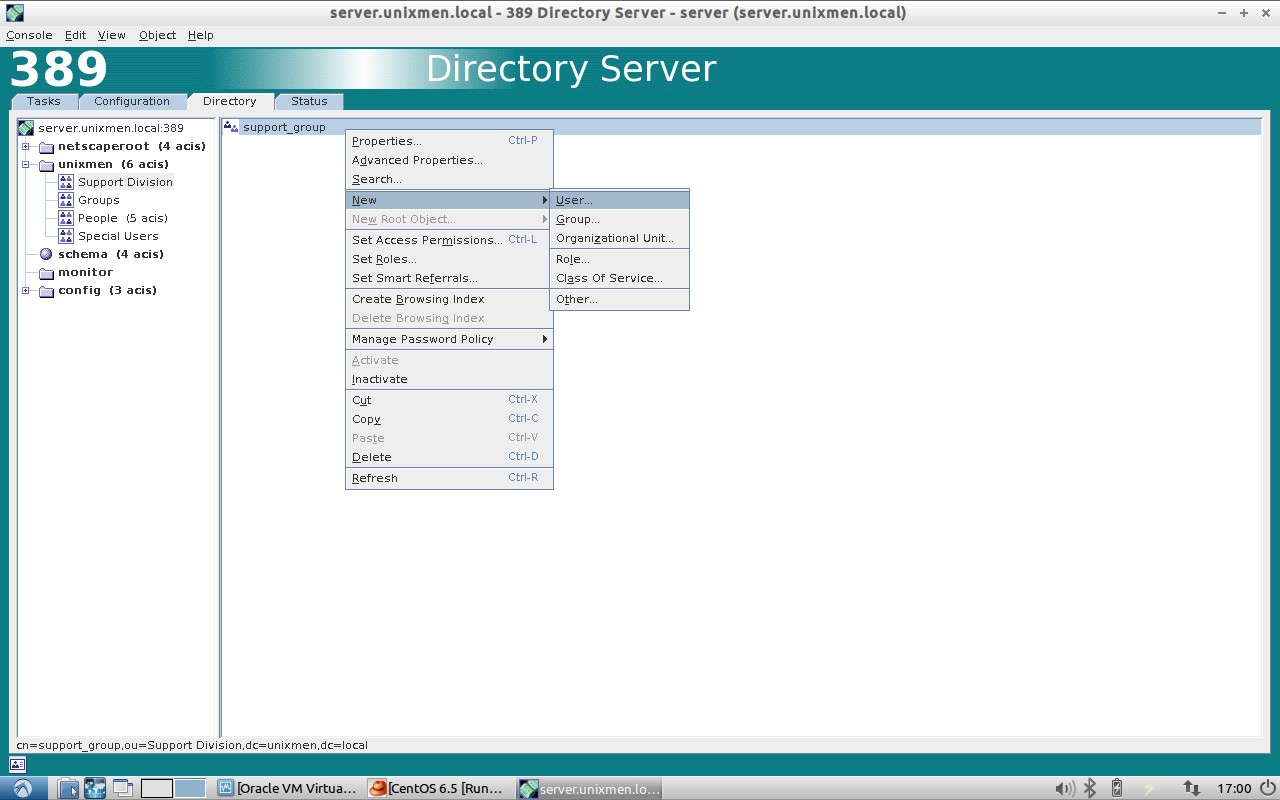 Enter the user details such as first name, last name, userid, mail id etc., and click Ok.
 Verify Organizational Unit, Group, User with following command on our server.
# ldapsearch -x -b "dc=unixmen,dc=local"
Sample output:
# extended LDIF # # LDAPv3 # basewith scope subtree # filter: (objectclass=*) # requesting: ALL # # unixmen.local dn: dc=unixmen,dc=local objectClass: top objectClass: domain dc: unixmen # Directory Administrators, unixmen.local dn: cn=Directory Administrators,dc=unixmen,dc=local objectClass: top objectClass: groupofuniquenames cn: Directory Administrators uniqueMember: cn=Directory Manager # Groups, unixmen.local dn: ou=Groups,dc=unixmen,dc=local objectClass: top objectClass: organizationalunit ou: Groups # People, unixmen.local dn: ou=People,dc=unixmen,dc=local objectClass: top objectClass: organizationalunit ou: People # Special Users, unixmen.local dn: ou=Special Users,dc=unixmen,dc=local objectClass: top objectClass: organizationalUnit ou: Special Users description: Special Administrative Accounts # Accounting Managers, Groups, unixmen.local dn: cn=Accounting Managers,ou=Groups,dc=unixmen,dc=local objectClass: top objectClass: groupOfUniqueNames cn: Accounting Managers ou: groups description: People who can manage accounting entries uniqueMember: cn=Directory Manager # HR Managers, Groups, unixmen.local dn: cn=HR Managers,ou=Groups,dc=unixmen,dc=local objectClass: top objectClass: groupOfUniqueNames cn: HR Managers ou: groups description: People who can manage HR entries uniqueMember: cn=Directory Manager # QA Managers, Groups, unixmen.local dn: cn=QA Managers,ou=Groups,dc=unixmen,dc=local objectClass: top objectClass: groupOfUniqueNames cn: QA Managers ou: groups description: People who can manage QA entries uniqueMember: cn=Directory Manager # PD Managers, Groups, unixmen.local dn: cn=PD Managers,ou=Groups,dc=unixmen,dc=local objectClass: top objectClass: groupOfUniqueNames cn: PD Managers ou: groups description: People who can manage engineer entries uniqueMember: cn=Directory Manager # Support Division, unixmen.local dn: ou=Support Division,dc=unixmen,dc=local ou: Support Division objectClass: top objectClass: organizationalunit # support_group, Support Division, unixmen.local dn: cn=support_group,ou=Support Division,dc=unixmen,dc=local objectClass: top objectClass: groupofuniquenames cn: support_group # skumar, support_group, Support Division, unixmen.local dn: uid=skumar,cn=support_group,ou=Support Division,dc=unixmen,dc=local mail: sk@unixmen.com uid: skumar givenName: senthil objectClass: top objectClass: person objectClass: organizationalPerson objectClass: inetorgperson sn: kumar cn: senthil kumar # search result search: 2 result: 0 Success # numResponses: 13 # numEntries: 12
As you see in the above output, a new OU called Support Division, a new group called support_vision, a new user called skumar has been created. I have covered only installation part and basic configuration. There are lot to learn about 389 ds. Refer the link provided at the bottom to know more about 389 ds.
In my personal experience, 389-ds is much easier than openldap in terms of installation and configuration. Let us see how to configure client systems to authenticate using LDAP server in our next article.